New house, new sewing room

We moved into our new house just before Thanksgiving. Nothing like moving and decorating for Christmas all at the same time, but we did it! In our old house, I operated out of our dining room. The space was plenty big enough, but I hated that everyone who came over walked straight into my “office”. Anyhow, when we found this house, it was decided that the third bedroom would be mine. I love that there is a door that I can close and hide my mess. I also got super excited about shopping for furniture to fill my space, rather than using our dining room table for everything. Like everything in my house, this is a work in progress. I’d love to paint the walls and get some color. I’m still back and forth on whether or not I’ll move the orange chair into Zac’s bedroom, but for today- here’s the tour.

This picture was snapped walking through the door. My favorite thing in this room is the butcher block island (purchased from Ikea) that I use as a cutting table. It’s 35.5″ high, making it perfect for cutting fabric and piecing patterns. 20288_10102614143053491_8697701657143798041_n.jpg

As you walk further into the room, I have two desks (also from Ikea), used for my sewing machine and serger. The picture ledge above the desk is also from Ikea. Can you tell I LOVE Ikea?? On the other side of the room is a futon. While not the most comfortable, it serves as our guest bed when my mom or mother in law come to stay. Zac also spends a great deal of time hanging out, reading books, and currently the sofa is covered in Star Wars action figures and the Millennium Falcon. If the pillows look familiar, they were previously in our guest room. I loved them and had to find a way to repurpose them in our new space. 11694913_10102614143103391_2616826652511001859_n.jpg12798946_10102614143063471_3714177160664656571_n.jpg

Here’s a peek inside the closet. I have fabric stored in the bins at the bottom, although I’d love to come up with a better storage solution. I added shelves to accommodate my silhouette cameo, and beside that is my backup singer sewing machine.12794524_10102614143248101_4834542297622223357_n.jpg

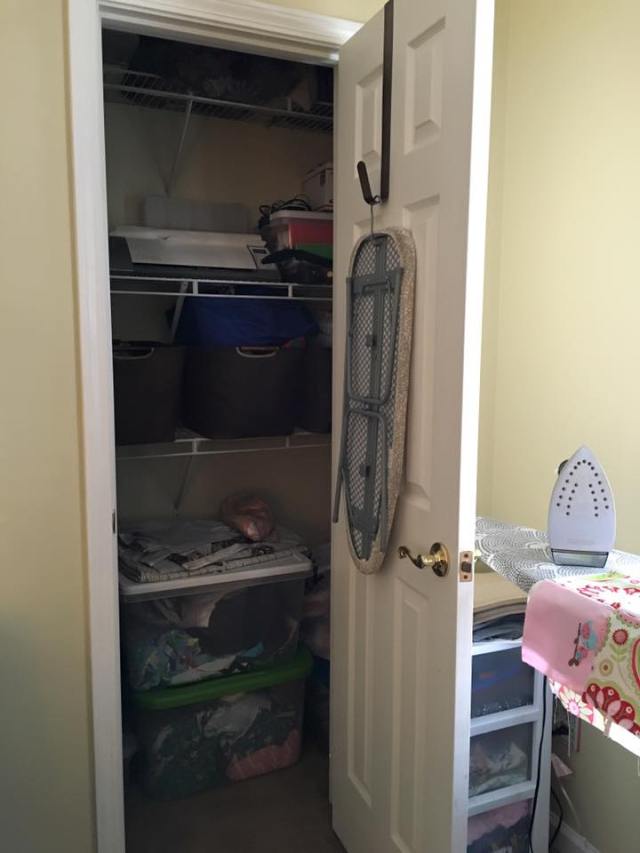
Here’s a better look at the desks. I have patterns stored in hanging files at the bottom of the filing cabinet. The top drawers house scissors, screw drivers, and other tools necessary when making a quick fix to either machine. And, the last picture is looking back towards the door. Under the island are shelves used to house more fabric, and random sewing supplies. On top of the island is a wooden block used to hold my quilting rulers. My embroidery machine is still on the antique singer sewing desk that belonged to Patrick’s great, great grandmother. 12794354_10102614143143311_7824083459947527487_n.jpg12799190_10102614143228141_5035551390596157663_n.jpg

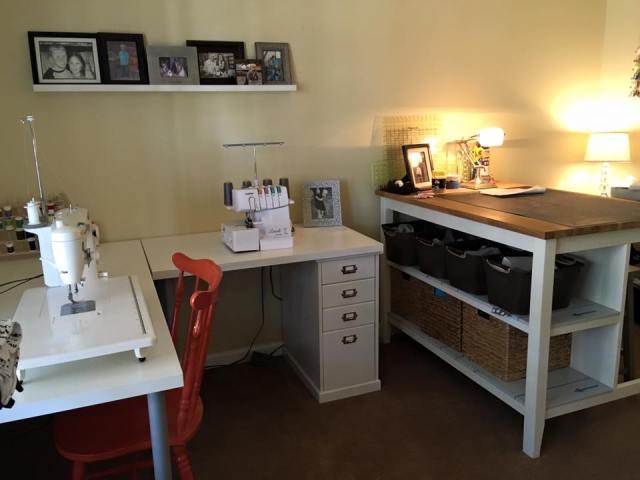
That’s it! Hope you enjoyed it. Next up on my house tour will be Zac’s room.

Tuesday Tutorial, sizing down a t-shirt

Hello friends and happy 2016! It’s been a (long) while since I’ve posted. Quick recap, we moved the week of Thanksgiving, and life has been crazy ever since. I’ve used the past few months to catch up on a few projects that have been pushed to the side, and I can’t wait to tell our story of the move, and show pictures of my new sewing space. Until then…

Zac is now obsessed with Star Wars. When he started to see previews for the new movie in December he asked to watch it. My husband jumped at the opportunity, so we ordered the original trilogy off Amazon, and watched episode 4, 5, and 6 over a long weekend. He was hooked and has probably watched them 100 times since then.

Last week, I was walking through Khols and they had adult t-shirts on sale. I thought, how cool would it be to get matching shirts for Zac and Patrick. To my surprise, my husband thought that was an awesome idea. Only problem, the smallest size they had was an adult small, and my son is a 4t.

Sizing down the shirt seemed easy enough, but this is the first time I’ve attempted to do it. First, I cut the shirt down the side seams, but left the neck intact. I cut the sleeves around the seams as well, and you can see that beside the shirt. IMG_6172.JPG

Next, I used an existing t-shirt pattern to ensure I sized down appropriately.

IMG_6173.JPG

IMG_6174.JPG

This would actually make an adorable tank top. I’ll have to remember that for summer… After I cut the body of the shirt, I did the sleeves. I used the sleeves I had cut off from the t-shirt, and kept the existing hem. Because my pattern had you hemming the sleeves, I just folded the bottom up about an inch to account for the difference.

IMG_6176.JPG

Once those were cut, I assembled my shirt just like you would if you started from scratch. I attached the sleeves with my serger, and then stitched the sides together. Finally, I hemmed the bottom. I love how this turned out, and using the existing neck binding saved me time. My son woke up this morning and even though it’s currently snowing outside, insisted on wearing his new Star Wars shirt to school. I can’t wait to get a picture of him and his daddy in their matching shirts when my husband gets home tonight.

IMG_6177.JPG

I hope this inspires someone else to tackle this quick sewing project. 🙂

IMG_6188.JPG 

UP

As a family we started Saturday evening movie nights with Zac. For my husband and me it’s been a great chance to catch up on children’s movies we’ve missed over the past decade. A couple weeks ago, the move we watched was Up. Seriously- this movie needs to come with a warning to parents that it’s a tear jerker, and now in the typical Disney movie way. If you haven’t seen the movie, stop reading now- spoilers ahead! From watching previews I knew the old man’s wife wasn’t going to make it, but was not prepared for the topic of infertility/miscarriage. Before Zac was born, we suffered two losses so this part of the movie (while brief) hit close to home. Thankfully Zac didn’t ask questions about why the couple was decorating a nursery and then the wife was crying in the doctor’s office. My husband and I just glanced at each other and then he went and got me some tissues.

The next morning, I was going through my stash of knit fabrics, and Zac saw my Up fabric. He was pointing out the balloons and characters and he asked me to make him a shirt. How could I say no to that? Zac always gets excited when I make him outfits or pajamas out of character fabrics, but I think this is the first time he specifically asked for something. I got right to work.

I decided I wanted to make a hoodie. Previously, I have made the all ears hoodie by Max & Meena and knew I could do the hood easily (not sure why that was intimidating to me), but I wanted to add a pocket and this pattern doesn’t offer that option. I then remembered I had a hoodie pattern from Brindille & Twig (free btw) and decided to merge the two. The Up fabric is really colorful, so I wanted to use it strategically.

I decided on using grey fabric for the body of the shirt and the Up fabric for the pocket, but first I added an appliqué. IMG_3668 IMG_3676

I decided to do the arms and the inside of the hood out of the Up fabric, and make the outer hood grey to match the front (and back) of the shirt. I went back and forth on what to do for the arm cuffs and the waist band, and decided on a dark grey and I’m glad I did. I absolutely love how this hoodie turned out, and Zac does too.IMG_3682 IMG_3689

The following day was Columbus Day and there was no school. My friend and I decided to take the boys to the Yellow River Game Ranch. The weather was gorgeous and it was a great opportunity to take some pictures of Zac in his new hoodie. Earlier this year my husband and I purchased a Sony a6000 camera and a 50 mm lens. It was a splurge, but I absolutely love this camera and the pictures I’m able to capture with it._DSC3092 _DSC3101 _DSC3127 _DSC3092

Tuesday Tutorial- bridesmaid dress quilt

A few years ago, I came across a pin on pinterest for a baby quilt used from a bridesmaid dress. Since then, I’ve made several of these blankets for customers and they’ve become one of my favorite projects to sew. The idea of making a quilt scares a lot of people, and I’m hoping this step by step tutorial eases your fears. If you can sew a straight line, then you can take on this project. I suggest investing in a cutting mat, a rotary cutter, straight edge, and a quilting ruler.

For the quilts I make, I usually pick out 4 fabrics that coordinate with the dress. My blankets measure anywhere from 36″ to 42″ square when completed, and if this is the size you desire, 1/4 of a yard is all you’ll need of each. IMG_8833

When you get your fabrics, iron and then cut to your desired size. For this quilt, I used a 6″ quilting ruler (which is actually 6.5″ square). To make my life easier, I cut my fabric in a 6.5″ strip, then used the quilting ruler to cut 5 equal sized squares. 
  

Repeat this with the remaining three fabrics.

When it comes to cutting the dress, don’t be afraid. Cut along the seams to give yourself large panels to work with. Do just like you did before and cut a 6.5″ strip and then use the quilting ruler to cut squares.


Once all of your squares are cut, lay them out in a design or pattern you think looks best. I always like the dress to be the middle square, and then I spread them out- always making sure each of the 5 patterns are represented in each row and column.

Now it’s time to sew! If you look behind my sewing machine in the picture, you can see how I have each of the rows laid out so they’re in order and ready.

Ta da!!! Once you have your five rows sewn together, iron the seams flat.

Now it’s time to sew your rows together to make into a blanket. I think this is the part that worries most first time quilters because with this type of blanket you want to make sure everything lines up. When I lay out two of the rows, I make sure that the seams line up exactly, then pin them in place. 
  

Once you’re pinned, it’s time to sew. Repeat this process with each remaining row. Then, just like before- iron your seams flat.
  

It’s up to you how fancy you want to get. I really like a border (or two) around the outside of my quilts. For this quilt, I used a double border and because the bridesmaid dress was long, I was able to use that too. For shorter dresses it’s not always possible to get strips of fabric long enough. For the first border on this dress, I used a grey fabric and cut it in 1.5″ strips. I sewed the strips along the sides, then across the top and bottom. Iron flat when you’re done.
  

Next up, I cut dress. I used 3″ strips for the outside.

Once your front is done, it’s time to attach the back. I used minky dot fleece for this quilt. This fabric sheds. A lot. It’s also sometimes almost slippery to work with. Use lots of pins and sew slowly. To attach the front to the back, lay your fleece down on floor, good side up.

Next, lay your quilt down so the “good” sides face one another. Cut off the salvage fleece at the top. Now, it’s time to pin. Make sure you leave yourself an opening, so that you can flip the quilt right side out.
  

When you’re done sewing, flip your quilt right side out. Iron your edge flat, and pin your hole closed. To give a finished look, I like to top stitch all the way around the quilt. Because you can see the thread, try your best to match the top thread to your top fabric, and your bobbin thread to your fleece.
  

Congratulations, you’re done!!! IMG_8938IMG_8945

Got Dirt?

Recently, I discovered the wonderful world of knit fabric, and the secret society of knit Facebook groups. In these groups, you get fabric for cheaper prices by placing (and paying) pre-orders and then waiting anywhere from 4-10 weeks for your fabric to arrive. These groups sell fabric by the yard, but many also sell panels. I wasn’t sure what these panels were at first, but OMG- they are fabulous, and compliment the fabrics they’re designed to match perfectly. Last month, I ordered a yard of the mighty machines fabric from Peekaboo Pattern Shop and a matching panel. The panels from this shop are different from most others because they’re twice the size of most (20″ by 28″), providing fabric for the front and back of a shirt. IMG_0515 I mentioned this shop in a previous post, and if you haven’t checked it out yet, you must. I purchased the Maui Muscle Tee pattern to use and both Zac and I are in love with the finished product. The shorts are from Brindle & Twig, and are one of my favorite patterns at the moment. They work great for boys and girls, and use no elastic- only lycra/cotton jersey fabric. Super comfortable and I think we’ll get 2 years wear out of the 3t/4t size for Zac. IMG_0474 IMG_0477 (1) If you want to try out any of the patterns from Peekaboo Pattern Shop, use my referral link for 15% off your first purchase. Happy shopping!! IMG_0512

The Wonderful World of Knits

I have several friends who also sew, and one thing I’ve heard over and over is how terrified people are to sew with knits. Raise your hand if this is you… It used to be me too, but not anymore. I LOVE knit fabric, and the possibilities are endless as to what you can create. I haven’t sewn with knits for long, but in the past 6 months I’ve learned a lot and want to share it with you.

Don’t be afraid!

Seriously, if you can sew with cotton fabric, you can sew with knit. I recommend (if you haven’t already), invest in a quality cutting mat, rotary cutter, and straight edge. These are really musts for anybody who sews, but especially with knits. Depending on what I’m making, I need to change my rotary blade often, and that’s OK. I love my serger for sewing with knits, but it isn’t a must. I promise, it’s addicting and you won’t regret purchasing one. I have the Brother 1034D, and it was less than $200 on Amazon. Prime shipping will get one to your door in 48 hours or less. 😉

Different types of knits

Jersey knit is sort of a generic term for the stretchy fabric that t-shirts and leggings are made out of, but there are different types of knits and they’re used for different things.

  • Cotton/Lycra blend- often called 95/5 (95% cotton, 5% lycra or spandex) is my favorite. It has excellent stretch and recovery and I use it whenever possible. It is great for pants for kids and grownups too.
  • Sweatshirt Fleece- just what it sounds like. It’s fuzzy on the back and is what sweatshirts and sweatpants are made out of.
  • Hacci Sweater Knit- unlike the sweatshirt knit, this is not like a typical sweater fabric. It’s thin and silky. I’ve used it for children’s clothing before, but it’s great for scarves or women’s tops.
  • Interlock- a variation of rib knit construction. Double knit constructions makes it a thicker fabric with a tight weave. It’s a great fabric to start with if knits make you nervous.

Quality fabric is worth the price

I’ve sewn with a lot of different types of fabrics from a lot of different suppliers, and the one thing I learned is that there is a reason cheap fabric is cheap. Something else to remember when buying any type of knit fabric is that you get a lot more per yard than typical fabrics, so take that into consideration when looking at the price. Normal jersey fabric is 58″ to 60″ wide. When making children’s pants, I can usually get 4 pairs of pants out of a yard of fabric, so it goes a long way.

The secret world of custom fabric

I’m part of several Facebook groups that pertain to sewing and embroidery. I was always seeing people post pictures of children’s items they crated with super cute fabrics that I could not find in stores. I recently unlocked the secret, and today I’m sharing that secret with you. There are Facebook groups for custom knit fabrics. I’m a member of at least a dozen, probably more, and then there are B/S/T (buy, sell, trade) groups for those groups too. These groups offer pre-sales of fabrics, offering them at usually $20 a yard. Once the pre-sale closes, the fabrics are printed, and then in 6-8 weeks they show up at your door. Don’t want to wait that long? That’s where the B/S/T groups come into play, BUT you will pay more for these fabrics later. I’ve seen some fabrics going as high as $100 a yard, but usually there is a 25% to 50% markup. The great thing about the B/S/T pages is that people offer FHs (FH stands for fat half, and it’s a half yard cut longways, so approximately 30″ by 36″), and you can get great fabrics for cheaper prices. A great place to start is the Knit Destash group on Facebook. Go check it out!

Working with a pattern

I love making clothes for my son. Trust me when I say that it’s worth it to pay money for a great pattern. Here are some of my favorite pattern shops!

I hope that this was helpful and inspires you to take the plunge. Here is a pic of Zac with his new Big Hero 6 pajamas. Shirt is raglan tee pattern from Brindle & Twig, pants are maxaloones, and the fabric is from Sew Cute Fabrics on Facebook.

IMG_0269

Jersey Knit Pajama Pants, tutorial

Earlier this spring, I purchased a serger. I justified this purchase by telling my husband I could start making clothing items for Zac and to list on Etsy. Easier said than done… Well, last month I ordered him a pair of jersey knit lounge pants from another Etsy shop and I made a shirt to match.20140806-072315-26595662.jpg

After looking at the pants and others we have here, I realized that I needed to bite the bullet. There are lots of sellers that make embroidered and appliquéd shirts, sellers that make pants, but few that do both.

I searched and searched for a pattern to make the pants and came up empty handed. So, I decided to make my own. I cut up an old pair of Christmas pajama pants and saw that this wouldn’t be as difficult as I thought.

20140806-072734-26854538.jpg20140806-072735-26855349.jpg20140806-072735-26855760.jpg

Looking at a pair of existing pants was incredibly helpful. I serged the legs of each piece of fabric, and then (carefully) pieced the two together and stitched the front/back/crotch together. Word to the wise: the serger will cut through straight pins, so remove them as you sew (lesson learned the hard way).

20140806-072927-26967047.jpg20140806-072944-26984457.jpg20140806-072952-26992775.jpg20140806-072958-26998614.jpg20140806-073931-27571258.jpg

Next up was the waste and leg cuffs. I cut 7 inches of the polkadot fabric, folded it over and serged the seam. I measured the waistband of another pair of Zac’s pants and serged one to match. I did the same with the leg cuffs.

20140806-073149-27109942.jpg20140806-073155-27115632.jpg20140806-073324-27204647.jpg20140806-073338-27218592.jpg

I was so anxious to finish at this point that my last pictures were taken after the fact. I lined up the waste (seam in the back) and serged that on, pulling it tight as I went. I repeated that with the legs, making sure the seam lined up with the inside seam of the pants.

20140806-073522-27322106.jpg20140806-073528-27328523.jpg

I designed the shirt to match and used some of the polkadot fabric from the pants too. I am in love with this set and I can’t wait to make more!! I am working on making a downloadable pattern for the blog, so check back soon. Until then, don’t be afraid to cut up a pair of pants and make your own!! For those who don’t sew, this set will be listed on Etsy soon.

20140806-073809-27489629.jpg20140806-073808-27488781.jpg20140806-073810-27490462.jpg

My model was less than cooperative…

20140806-073921-27561327.jpg20140806-073921-27561687.jpg


Back and better than ever!

My sister is here visiting this week, so Thursday Zac and I went down to my parents’ house to spend the day with her. Conveniently on the way was the Atlanta Sewing Machine Co. (a Singer verified warranty center).

IMG_6130

It seriously broke my heart to leave my machine. I feel like she is a member of the family. The people there were awesome. Someone immediately glanced at my machine, and my scrap piece of fabric showing the bobbin hiccups, and how they improved with increased tension.

IMG_6106

IMG_6107

Just from glancing at my machine, she could see that the needle plate needed buffed. She offered to have their tech look at it immediately if I had 30 minutes to wait. No amount of yogurt covered raisins could keep my child contained in a sewing machine repair shop for 30 minutes, so I told her thanks, but we didn’t need to wait- we were on our way to see Aunt Abbey, Nana, and Ugh (Zac speak for Grandpa). She said that they would call me in a bit and give me the diagnosis. I left the shop at 11:15, and at 1:30 they called to tell me it was ready to be picked up. I really thought that I’d be without my machine for at least a week. The repair shop was just 30 minutes away from my parents’ house, so I was able to go and get it then. I was stoked! They gave me a test piece of fabric showing all the stitches, and it was perfection. When I got home, I plugged it in, and tried it out for myself. I swear, it sews better than the day I bought it. Because my machine is less than a year old, and because I went to a warranty center, I didn’t have to pay a dime. They cleaned, oiled, and toned-up the machine. They buffed the needle pole, reset the hook for the automatic needle threader, and adjusted the tension (the cause of my issues). They also replaced the place where the electrical cord plugs in, because as often as Zac has yanked on it, the cord didn’t fit tight.

This weekend I am finishing up a t-shirt quilt for a graduating high school senior, and then it’s to work on Project Guest Room. My husband is cutting the plywood for the headboard tomorrow, then I hope to paint the room Sunday, and after that, it’s pillows. Ahhh, can’t wait, so stay tuned friends!

Not my day

It seems that this always happens to me- a 5 minute project ends up consuming your entire day. This morning I ran to Hobby Lobby for fabric for the upholstered headboard. While I was there I found a funky floral fabric that I thought would make a fun accent pillow for the bed. During nap time, I decided to stitch it up quick to see how it looked. “Quick” it was not.

When I looked at the back side of the fabric, I could see that the bobbin thread was bunching. I did what anybody with a sewing machine would do, retreaded the top and bobbin thread and tried again. Bunching was still there. I trouble shouted some more and took out the whole bobbin case, blew out the dust. That wasn’t it either. I changed the needle, tried different thread, tried different fabric, consulted Dr. Google, messed with the tension- which helped somewhat, but not enough. I eventually ended up on hold with Singer for over an hour before speaking with a human.

I understand that the average person probably is clueless. She walked me through threading my machine, asked me if I was using Singer needles and bobbins, and troubleshooted changing tension settings before telling me that I needed to take my machine in for servicing. Not what I wanted to hear. My machine is only 9 months old, so thankfully everything is under warranty, but the closest warranty center is almost an hour away. I already planned to visit my family on Thursday, so I’ll drop it off then, and pray it’s a quick & easy fix. It makes me physically ill to think about being without my machine, but it needs to be fixed.

I write this post so that hopefully someone else who’s having this annoying issue can look here and see they’re not crazy. I’ll update with my diagnosis too. Here you can see the top of the fabric vs the back. The zigzag stitch is the worst. The different lines are different tensions. The higher the tension, the better the bobbin thread is.

20140513-202129.jpg

Here is a close up of the back of a straight stitch. The thread kinda loops.

20140513-202223.jpg

And here’s my pillow. I’m in love!

20140513-202258.jpg

20140513-202310.jpg

Worst. Blogger. Ever.

I have said it before. I’m sure I will say it again. I am horrible with blogging, but I spent today revamping my blog and am now energized. Because nobody wants a recap of the last 3 months in one post, I’ll do like I have in the past and write several over the next few weeks recapping what I’ve been up to. Most recently, I’ve had fun using my embroidery machine to make burp clothes. My mom was here for a weekend and we made some for a friend of hers that has a new baby boy. New projects mean an excuse to purchase new fabric for me. I am part of an embroidery group on Facebook that’s served as a great inspiration for projects and a valuable resource for questions with my new craft. Somebody there posted about an the Stitch Stash Diva shop on etsy. OMG, I was in fabric heaven!! I have a small addition to shopping online, but fabric can be difficult because typically you can not order less than 1/2 a yard. In the world of embroidery, that is a lot. This shop let’s you buy fat quarters (1/4 of a yard of fabric), and that is the perfect amount. Fast forward to this week and my order arrived. With my new treasures I created some burp clothes for my cousin who just had a baby. I need to get these listed on etsy. Hopefully that can be a project for this week.

While I had fabric spread across my dining room, my son came in and found a piece of construction truck fabric that he attached himself to. He carried this square of fabric around all weekend, so I decided to sew that into a blankie for him. I love project that don’t cost me any money. The construction fabric was leftover from his birthday shirt, and the orange minky fabric that I backed it with was left over from another project.

Here are a few snap shots!

20140331-172430.jpg

20140331-172438.jpg

20140331-172445.jpg

20140331-172453.jpg