Playing catch-up, memory t-shirt quilt

My high school t-shirt quilt was the first thing I ever sewed for myself. It was a hot mess, and I learned a ton, but somehow it came together. From there, I made a quilt for my sister, and then sewed my college t-shirts into a quilt. After I felt like I really knew what I was doing, I offered up the service for my school’s Relay 4 Life silent auction. Business grew from there. Social media has helped me reach even more people, and that’s where I met the family for this quilt.

Almost 2 years ago, a mom reached out to my through my Sew Sassy Facebook page. Her daughter’s boyfriend recently passed away and she wanted to use his shirts to make a quilt. The mom had seen pictures of my work, but told me that the daughter had a lot of shirts she wanted incorporated into the blanket. The family was local to Atlanta, so I met up with them to get a better idea of their inspiration. Usually, I use squares out of t-shirts with fabric sashing between. When this family came to meet with me, I knew that my usual pattern wouldn’t work for this. She wanted everything incorporated. When I say everything, I mean everything. She had outfits of his, outfits of hers (that were worn in pictures they took together), concert shirts, music festival wristbands, and shirts from places they visited. Everything.

I was up for the challenge, and this family was beyond wonderful to work with. When the stuff arrived at my house the girl carefully marked things she wanted. I wish I was better about taking “before” pictures, but I think this is all I have. All shirts were marked with painters tape, with logos outlined, or notes stating how she wanted the garment used.

IMG_0923.JPGIMG_2240.jpgIMG_2239.jpg

I was still unsure how I was going to make it all come together, but went ahead and ironed the stabilizer on the back of the knit shirts. While I was ironing (and ironing, and ironing), I had the idea to create squares. Usually, I cut my t-shirts for quilts into 15″ squares. Since I had way too many shirts to do that, I would use multiple shirts to make up a 15″ square. Then, sew all my squares together for the finished quilt.

First, I cut the shirts so they were square (or rectangle). I had a whole box of stuff that I called “filler”, and decided to use those to fill in the gaps. Here you can see some of the shirts cut, and how I started to fill in to make squares.IMG_1305.jpg

Once I got that laid out I knew that this idea would work. I then started filling in the smaller pieces. Below you can see one of the wrist bands (bottom center square).

IMG_1322.jpgIMG_1331.jpgIMG_2232.jpg

Finally, I was ready to put all 30 squares tougher. In my “filler” bag were pieces that she asked for me to use as much as possible throughout the quilt, so I decided to make bands to run horizontally across the quilt between each of my rows. IMG_2352.jpg

I love how the bands turned out and really broke up the monotony of the squares. I was given a flat sheet in my box of shirts, and we decided to use that for the back of the quilt. Over 100 pieces were used to create this quilt. Finished, it fits a full/queen size bed. It’s the largest and most in-deapth project I’ve done thus far, and I LOVE how it all came together. I really hope this quilt is a source of comfort. It was an honor to be trusted with the memories.

IMG_3458.jpgIMG_3456.jpgIMG_3460.jpgIMG_3457.jpg

Footnote- I started this project at the end of May 2015. I worked on it throughout the summer, but it was difficult with Zac who was 3 and a half at the time. Once he went back to school in August, I started to kick it into gear. However, it was at that same time decided to list our house. Everything went into storage (our formal dining room was my “office”), but the house sold in a day and I got to get back to work quicker than expected. I’m not sure how it all got done, but it did. Super thankful for our new house and an office with a door to hide my mess.

Normal is boring

I’ve said it a million times… I’m an awful blogger. The longer I go without making a post, the tougher it is to sit down and write. Part of what’s added to the craziness is that I went back to work this year. I was a teacher in my former life, and became a stay-at-home mom when Zac was born. Teaching is a passion, but with a pre-schooler who needs me, working a traditional job (teaching public school) was impossible with our schedule. Instead, I’m teaching pre-K at my son’s former church pre-school. I am still able to drive Zac to school every morning, go teach my kiddos, then have an hour (sometimes more) in the afternoons before the bus brings him home. It’s the best of both worlds and I love it.

Working in a pre-school is great in so many ways, but one benefit (for me) is a relaxed dress code. When I taught in the public school system, I dressed up most days. Now, my uniform consists of jeans, a graphic tee, and comfortable shoes. Because I’m me, I’ve enjoyed designing my own t-shirts for work. It’s expanded into selling them to friends and followers.

My newest (and favorite) t-shirt design was actually inspired by my son. Zac was officially diagnosed with autism a year ago. I know every parent reacts differently to receiving an autism diagnosis for their child, but for me it was a relief. Zac was already in an autism preschool program for a year at that point, but once we received the diagnosis we were able to get help for private occupational therapy. A few weeks ago, while I was in the waiting room at his therapy office, one of the speech therapists asked me if I ever made an autism shirt. April is autism awareness month, and she hadn’t found anything she liked. A couple days later one of Zac’s old OTs reached out to me asking the exact same thing, so I decided to draft something up.

IMG_7537.JPG

I love this shirt. I love bringing awareness to autism. When I had my suspicions about Zac, I actually had somebody (a professional) tell me there was no way he could have autism because he smiled, laughed, and enjoyed being hugged and tickled. If you’ve met one kid with autism, you’ve met one kid with autism. No two kids are the same. When you hear, “it’s a spectrum” people tend to to think of a linear line where autism is categorized mild to severe. It is a spectrum, but there are many spectrums- verbal communication, nonverbal communication, social awareness, sensory integration, cognition, and adaptability. My son didn’t talk until he was 3, but now at age 5 is VERY verbal. The kid never stops talking and asking questions. Zac struggles most with sensory integration. He craves movement and touch, but is super sensitive to certain noises. I am amazed at the progress he’s made through school and private therapy. We’re now at a place where he can say, “mommy, it’s too loud in here.” It’s saved him (and us) from struggling through a meltdown. Pic Jointer.png

Autism has brought some wonderful people into our lives- teachers, therapists, fellow moms… I’m thankful for every one of them, and the impact they’ve had Zac.

New house, new sewing room

We moved into our new house just before Thanksgiving. Nothing like moving and decorating for Christmas all at the same time, but we did it! In our old house, I operated out of our dining room. The space was plenty big enough, but I hated that everyone who came over walked straight into my “office”. Anyhow, when we found this house, it was decided that the third bedroom would be mine. I love that there is a door that I can close and hide my mess. I also got super excited about shopping for furniture to fill my space, rather than using our dining room table for everything. Like everything in my house, this is a work in progress. I’d love to paint the walls and get some color. I’m still back and forth on whether or not I’ll move the orange chair into Zac’s bedroom, but for today- here’s the tour.

This picture was snapped walking through the door. My favorite thing in this room is the butcher block island (purchased from Ikea) that I use as a cutting table. It’s 35.5″ high, making it perfect for cutting fabric and piecing patterns. 20288_10102614143053491_8697701657143798041_n.jpg

As you walk further into the room, I have two desks (also from Ikea), used for my sewing machine and serger. The picture ledge above the desk is also from Ikea. Can you tell I LOVE Ikea?? On the other side of the room is a futon. While not the most comfortable, it serves as our guest bed when my mom or mother in law come to stay. Zac also spends a great deal of time hanging out, reading books, and currently the sofa is covered in Star Wars action figures and the Millennium Falcon. If the pillows look familiar, they were previously in our guest room. I loved them and had to find a way to repurpose them in our new space. 11694913_10102614143103391_2616826652511001859_n.jpg12798946_10102614143063471_3714177160664656571_n.jpg

Here’s a peek inside the closet. I have fabric stored in the bins at the bottom, although I’d love to come up with a better storage solution. I added shelves to accommodate my silhouette cameo, and beside that is my backup singer sewing machine.12794524_10102614143248101_4834542297622223357_n.jpg

Here’s a better look at the desks. I have patterns stored in hanging files at the bottom of the filing cabinet. The top drawers house scissors, screw drivers, and other tools necessary when making a quick fix to either machine. And, the last picture is looking back towards the door. Under the island are shelves used to house more fabric, and random sewing supplies. On top of the island is a wooden block used to hold my quilting rulers. My embroidery machine is still on the antique singer sewing desk that belonged to Patrick’s great, great grandmother. 12794354_10102614143143311_7824083459947527487_n.jpg12799190_10102614143228141_5035551390596157663_n.jpg

That’s it! Hope you enjoyed it. Next up on my house tour will be Zac’s room.

DIY shelves

I’m almost complete with my 1 room, 30 days bathroom challenge and I can’t believe the transformation. Today I completed the shelves and couldn’t wait to post about it. I found several posts on Pinterest about DIY shelving, and thought- what the hell!

I bought a board from Lowes (10″ deep x8′ long) for less than $8. I also bought stain, brackets to hang it on, and my favorite antique bronze spraypaint because the brackets were silver. (Also on my cart was my shower rod).  

Over the weekend my husband cut the board to length for me. I decided to make my three shelves 22″, which gave me a slightly longer board left over that I hung in my laundry room for more storage there.   

Yesterday I got to work staining and spray painting. I don’t think I’ve ever stained anything before, but it was pretty easy and I only needed one coat. 


I let everything dry overnight and got to work hanging them today. I first used the long level to mark a line on one side of the toilet and used that as a guide for one side of brackets. I used drywall anchors rated for 75 pounds, so I feel confident that these shelves are secure.   

Hanging the left side was the tricky part. I needed to make sure the brackets were level horizontally and vertically. An extra pair or hands would have been helpful, but I was able to make it work using the level.    


Next up was the fun part. I made sure the shelves lined up and were centered on the brackets, then secured them with a screw from underneath. I am in love with how this turned out. All together, I spent around $45 (3 sets of brackets at $7 each, $8 for the board, $7 for stain, and $6 for spray paint, plus screws). 

  
Lucky me, baskets and home decor was 50% off at Hobby Lobby this week. I have toilet paper in the red bucket and wash clothes in the basket on the middle shelf. The picture frame and anchor artwork are also from Hobby Lobby, and the sailboat is from Target. Next up for my bathroom makeover is towels, but I’m going to take the next couple days and catch up on some sewing. 


1 room, 30 days- bathroom makeover

Our house is a ranch, 3 bedrooms, 2 baths. The guest bathroom/Zac’s bathroom was covered in a floral wallpaper that was peeling. It looked OK when the previous owner lived here, but Zac’s bathroom stuff from the old house clashed terribly.  Anybody who visits our house uses this bathroom, so I felt motivated to get the looking nice. 

   
A few weeks ago I decided to see what would happen if I started peeling the paper off. Good news- it literally peeled off in sheets. Bad news- behind the wallpaper was this horrible textured paint…


So, fastforward to April. I am taking part is a 1 room, 30 day challenge, and given the state of this bathroom it was a no-brainier as to which room needed the most help in our house. The first thing that needed done was the walls. 

The walls looked worse than they felt, but they were bad. I ventured off to our local Sherwin Williams and asked for guidance. They were super helpful and recommended a matte finish of paint. The guy said any sort of gloss, or even an eggshell finish would highlight the texture. I bought a paint + primer of their top of the line Emerald paint. While searching Pinterest, I decided on Repose Gray for color. This paint was worth the money. It covered fantastic, and while the walls still show a little bit of texture, it’s 100% better, and probably the best it could be without re-drywalling the room.

 Next, I bought a new shower rod. I wanted something to match the rest of the fixtures in the bathroom, so I bought one in antique bronze. I also hung a picture I bought from Target. This week, I’m making shelves to go behind the toilet, and trying to decide what I want to do for towels and find a bath mat. Stay tuned!  

The Story of our Move…

Off and on for the past year or two, my husband and I have contemplated moving. He grew up in a home outside of a neighborhood with tons of land, and that’s always been his dream for us. Occasionally on the weekends, we’ll go out for a drive and check out different areas to see if any homes are for sale, but nothing ever felt “right” until this…

I remember the day well. Zac had a rough night and woke up super cranky. He gave up naps around the age of 3, but that day we were desperate. We threw him in the car on a Saturday afternoon and took a drive. After an hour or two, we were almost home (less than 2 miles) when we passed a little yellow ranch, hidden behind trees, that had a for sale sign in the yard. I jotted down the address, and when we got home I looked it up. The pictures were amazing! Because moving wasn’t a new idea for us, we had an agent that we were working with, and I gave her a call to see if we could tour the house.

The next day was Sunday, and we went to see the house in person that afternoon. So many times, you see pictures online and then the houses are crap when you go in person. That wasn’t the case here. We fell instantly in love and knew that THIS is where we were supposed to be. Only problem, our house wasn’t even on the market. The following days were a blur. We made an offer and never heard back, but our awesome agent fought hard for us and after the longest 5 days of our lives, we heard that they accepted our offer.

In the mean time, I was in beast mode, getting our house ready to list. I threw away more bags of trash than I can even count. We rented a storage unit, and everything that we wanted to keep but could live without went in. We had our carpets stretched, the outside of our house pressure washed, new mulch in the flower beds, and the inside was painted by professionals. The best thing I did was hired a maid service to give our house the royal treatment, and then we were ready.

Our house went on the market on Monday, September 14. Tuesday we had several showings. I left the house at lunchtime that day, and we didn’t come home until 8 that night, but it was worth it. That night we got a full price offer. For me, that solidified that this move was the right decision, and at the risk of sounding cheesy, “meant to be.”

The owner of the house we were buying didn’t want to close until the end of November. Amazingly, that date was fine with the people buying our house, so on November 20 we had back-to-back closings, and we officially moved into the new  house on November 23 (three days before Thanksgiving). It’s been a whirlwind since then, but we are seriously loving life in our new home. I can’t wait to share pictures and give a “tour” in the upcoming weeks.

Tuesday Tutorial, sizing down a t-shirt

Hello friends and happy 2016! It’s been a (long) while since I’ve posted. Quick recap, we moved the week of Thanksgiving, and life has been crazy ever since. I’ve used the past few months to catch up on a few projects that have been pushed to the side, and I can’t wait to tell our story of the move, and show pictures of my new sewing space. Until then…

Zac is now obsessed with Star Wars. When he started to see previews for the new movie in December he asked to watch it. My husband jumped at the opportunity, so we ordered the original trilogy off Amazon, and watched episode 4, 5, and 6 over a long weekend. He was hooked and has probably watched them 100 times since then.

Last week, I was walking through Khols and they had adult t-shirts on sale. I thought, how cool would it be to get matching shirts for Zac and Patrick. To my surprise, my husband thought that was an awesome idea. Only problem, the smallest size they had was an adult small, and my son is a 4t.

Sizing down the shirt seemed easy enough, but this is the first time I’ve attempted to do it. First, I cut the shirt down the side seams, but left the neck intact. I cut the sleeves around the seams as well, and you can see that beside the shirt. IMG_6172.JPG

Next, I used an existing t-shirt pattern to ensure I sized down appropriately.

IMG_6173.JPG

IMG_6174.JPG

This would actually make an adorable tank top. I’ll have to remember that for summer… After I cut the body of the shirt, I did the sleeves. I used the sleeves I had cut off from the t-shirt, and kept the existing hem. Because my pattern had you hemming the sleeves, I just folded the bottom up about an inch to account for the difference.

IMG_6176.JPG

Once those were cut, I assembled my shirt just like you would if you started from scratch. I attached the sleeves with my serger, and then stitched the sides together. Finally, I hemmed the bottom. I love how this turned out, and using the existing neck binding saved me time. My son woke up this morning and even though it’s currently snowing outside, insisted on wearing his new Star Wars shirt to school. I can’t wait to get a picture of him and his daddy in their matching shirts when my husband gets home tonight.

IMG_6177.JPG

I hope this inspires someone else to tackle this quick sewing project. 🙂

IMG_6188.JPG 

UP

As a family we started Saturday evening movie nights with Zac. For my husband and me it’s been a great chance to catch up on children’s movies we’ve missed over the past decade. A couple weeks ago, the move we watched was Up. Seriously- this movie needs to come with a warning to parents that it’s a tear jerker, and now in the typical Disney movie way. If you haven’t seen the movie, stop reading now- spoilers ahead! From watching previews I knew the old man’s wife wasn’t going to make it, but was not prepared for the topic of infertility/miscarriage. Before Zac was born, we suffered two losses so this part of the movie (while brief) hit close to home. Thankfully Zac didn’t ask questions about why the couple was decorating a nursery and then the wife was crying in the doctor’s office. My husband and I just glanced at each other and then he went and got me some tissues.

The next morning, I was going through my stash of knit fabrics, and Zac saw my Up fabric. He was pointing out the balloons and characters and he asked me to make him a shirt. How could I say no to that? Zac always gets excited when I make him outfits or pajamas out of character fabrics, but I think this is the first time he specifically asked for something. I got right to work.

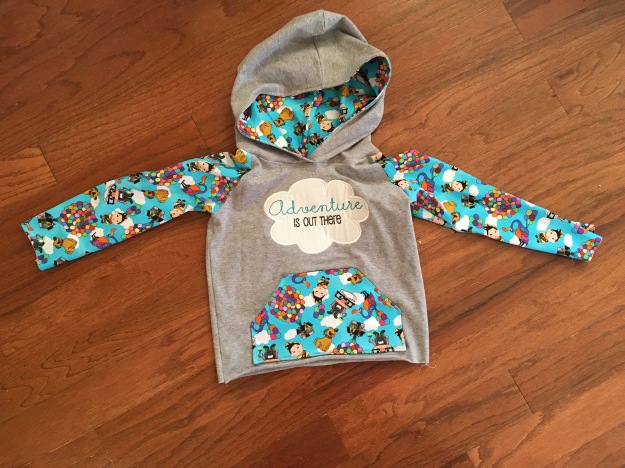
I decided I wanted to make a hoodie. Previously, I have made the all ears hoodie by Max & Meena and knew I could do the hood easily (not sure why that was intimidating to me), but I wanted to add a pocket and this pattern doesn’t offer that option. I then remembered I had a hoodie pattern from Brindille & Twig (free btw) and decided to merge the two. The Up fabric is really colorful, so I wanted to use it strategically.

I decided on using grey fabric for the body of the shirt and the Up fabric for the pocket, but first I added an appliqué. IMG_3668 IMG_3676

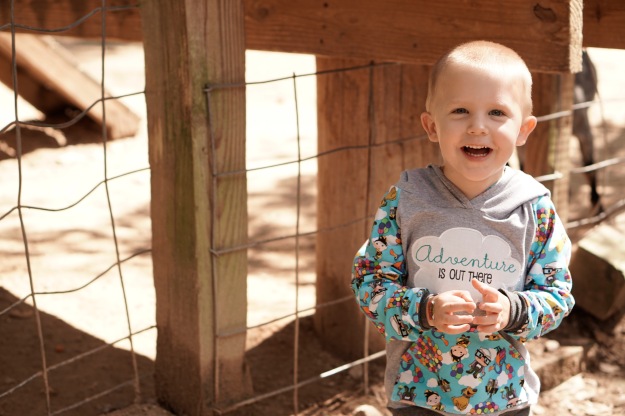
I decided to do the arms and the inside of the hood out of the Up fabric, and make the outer hood grey to match the front (and back) of the shirt. I went back and forth on what to do for the arm cuffs and the waist band, and decided on a dark grey and I’m glad I did. I absolutely love how this hoodie turned out, and Zac does too.IMG_3682 IMG_3689

The following day was Columbus Day and there was no school. My friend and I decided to take the boys to the Yellow River Game Ranch. The weather was gorgeous and it was a great opportunity to take some pictures of Zac in his new hoodie. Earlier this year my husband and I purchased a Sony a6000 camera and a 50 mm lens. It was a splurge, but I absolutely love this camera and the pictures I’m able to capture with it._DSC3092 _DSC3101 _DSC3127 _DSC3092

Tuesday Tutorial- bridesmaid dress quilt

A few years ago, I came across a pin on pinterest for a baby quilt used from a bridesmaid dress. Since then, I’ve made several of these blankets for customers and they’ve become one of my favorite projects to sew. The idea of making a quilt scares a lot of people, and I’m hoping this step by step tutorial eases your fears. If you can sew a straight line, then you can take on this project. I suggest investing in a cutting mat, a rotary cutter, straight edge, and a quilting ruler.
For the quilts I make, I usually pick out 4 fabrics that coordinate with the dress. My blankets measure anywhere from 36″ to 42″ square when completed, and if this is the size you desire, 1/4 of a yard is all you’ll need of each. IMG_8833

When you get your fabrics, iron and then cut to your desired size. For this quilt, I used a 6″ quilting ruler (which is actually 6.5″ square). To make my life easier, I cut my fabric in a 6.5″ strip, then used the quilting ruler to cut 5 equal sized squares. 
  

Repeat this with the remaining three fabrics.

When it comes to cutting the dress, don’t be afraid. Cut along the seams to give yourself large panels to work with. Do just like you did before and cut a 6.5″ strip and then use the quilting ruler to cut squares.


Once all of your squares are cut, lay them out in a design or pattern you think looks best. I always like the dress to be the middle square, and then I spread them out- always making sure each of the 5 patterns are represented in each row and column.

Now it’s time to sew! If you look behind my sewing machine in the picture, you can see how I have each of the rows laid out so they’re in order and ready.

Ta da!!! Once you have your five rows sewn together, iron the seams flat.

Now it’s time to sew your rows together to make into a blanket. I think this is the part that worries most first time quilters because with this type of blanket you want to make sure everything lines up. When I lay out two of the rows, I make sure that the seams line up exactly, then pin them in place. 
  

Once you’re pinned, it’s time to sew. Repeat this process with each remaining row. Then, just like before- iron your seams flat.
  

It’s up to you how fancy you want to get. I really like a border (or two) around the outside of my quilts. For this quilt, I used a double border and because the bridesmaid dress was long, I was able to use that too. For shorter dresses it’s not always possible to get strips of fabric long enough. For the first border on this dress, I used a grey fabric and cut it in 1.5″ strips. I sewed the strips along the sides, then across the top and bottom. Iron flat when you’re done.
  

Next up, I cut dress. I used 3″ strips for the outside.

Once your front is done, it’s time to attach the back. I used minky dot fleece for this quilt. This fabric sheds. A lot. It’s also sometimes almost slippery to work with. Use lots of pins and sew slowly. To attach the front to the back, lay your fleece down on floor, good side up.

Next, lay your quilt down so the “good” sides face one another. Cut off the salvage fleece at the top. Now, it’s time to pin. Make sure you leave yourself an opening, so that you can flip the quilt right side out.
  

When you’re done sewing, flip your quilt right side out. Iron your edge flat, and pin your hole closed. To give a finished look, I like to top stitch all the way around the quilt. Because you can see the thread, try your best to match the top thread to your top fabric, and your bobbin thread to your fleece.
  

Congratulations, you’re done!!! IMG_8938IMG_8945

I’m back

Happy Sunday friends!! It’s been awhile. I’ll do my best to post a recap this week as to what’s been going on with us. Summer with Zac home from school was busy. At 3 and a half years old, he was constantly on the go and spent the majority of our days at the swimming pool. In August he went back to school and I though life was going to get back to normal, but it didn’t. While my husband and I were out for a drive one weekend, we found a house just outside our neighborhood that was for sale. We looked it up, fell in love, made an offer and it was accepted! In two weeks’s time, we were able to get our house ready to list, and it was on the market a day before we had an offer and were then under contract!

Our dining room has acted as the headquarters of Sew Sassy Creations for the past few years, but for the purposes of selling our house it needed to be transformed back into a dining room. All of my stuff was packed and taken to storage. Now that we’re under contract, out of due diligence, and past the inspection and appraisal, I’m able to bring some stuff back (happy dance!). I’m super stoked because in the new house I’ll have my very own dedicated workspace, with a door! I’m spending my days now searching pinterest trying to decide how to set up my new space.

Attached are some pictures from the summer, Zac’s first day at school (fabric from Peekaboo fabric shop), and a picture of him sitting on the porch swing at our new house the day we went to see it for the first time. I literally carried him away kicking and screaming because he didn’t want to go back home. We took that as a good sign that he approved.

IMG_0524

IMG_2167

IMG_2189

IMG_2583