Baby Onesie Quilts

I’ve said it before, but I’ll say it again- baby onesie quilts are my FAVORITE thing to sew. They are the perfect way to preserve your child’s baby clothes. I know I’m not the only one who has trouble giving away my son’s cloths. There are so many shirts or pajamas that have sentimental value, like the outfit he wore when he came home from the hospital, or my favorite sleeper that had the monkey on the butt… So many people save these precious memories, but they’re idea of saving them are boxing them up and throwing them in the attic. This quilt is something we use constantly. It allows me to keep my favorite things, without my husband calling me a hoarder.

This post is combining 2 different projects. Well, to be technical, 3 projects. The first were onesie quilts for a set of twin boys. Their mom got my name from a friend. (PS referrals are how I get business). She was so meticulous about what outfits she selected for their blankets. We chose coordinating fabric, an aqua and a navy gingham fabric. These quilts are slightly different from ones I’ve done in the past. They mimic how I do adult t-shirt quilts, and not the checkerboard pattern I’ve done in the past. The squares are still 6″, but there are 25 outfits instead of the 18. They still measure 42″ complete, and are backed with fleece as opposed to flannel.

The second (or third) project was a onesie quilt for my best friend’s daughter. She is exactly 10 weeks older than my son, and while these are outfits she wore her first year, it was a present for her second birthday. Belle loves owls, so her mommy selected this fabric, for her blanket. The back is a coordinating flannel print, in a bright and festive pink. This blanket measures 42″ square, and uses 18 outfits, each measuring 6″ square.

IMG_5518

IMG_5567

IMG_5554

IMG_5565

IMG_6014

IMG_6250

IMG_6251

IMG_6174

Toddler Towels

In my quest to find things to embroider, I came across a tutorial to make hooded towels for kids. My son is about to turn 2, and we were still using towels he received as a newborn. Bless his heart, I needed two to get him completely covered and dried off after a bath. I decided it was time for an upgrade. Like my previous experiences with the embroidery machine, there was some trial and error involved. Making the hooded towels myself makes it loads easier than embroidering on an existing hooded towel, because I can lay the top flat inside the embroidery hoop.

Hooded towels are one of the new items I plan to offer in my etsy shop starting in January. I purchased some basic designs for kids, a butterfly, owl, sailboat, whale… and then came across the mother-load of Yo Gabba Gabba designs. To help build my portfolio, I offered to make some of these for friends if they provided the materials. I’m still waiting on some, and I’ll add those photos once they’re complete.

Image

Image

Image

Image

Image

Bridesmaid Dress Baby Quilt

A few months ago, I came across a picture on Pinterest of a woman who used a bridesmaid dress as fabric for a quilt to give as a baby gift for her friend (the bride). After some google investigation, I found her blog. I tucked this idea aside and hoped that I’d be able to do this at some point in the future.

That “future” arrived last month when a friend of a friend contacted me through Facebook, and showed me this exact same blog post as an example of what she was looking for. I was over the moon excited about this project.

The theme for the baby’s nursery is sailboats, so I went with that when selecting fabric. Because the bridesmaid dress is a satin, I was afraid of that fabric appearing out of place with other cotton or flannel squares. So, I decided to use an assortment of fabrics and textures. I think the finished product is amazing.

This quilt measures approximately 36″ square. The sailboat fabric is flannel, the red and white rope print is cotton, the brown and white stripes is seersucker, the blue nautical print is chambray, the white is muslin, and the brown is the dress. Baby blue minky dot fleece fabric was used to back the blanket.

20131115-121628.jpg

20131115-121648.jpg

20131115-121738.jpg

20131115-121824.jpg

20131115-121927.jpg

The Embroidery Machine

What? 2 days in a row!! Get ready readers, because I plan to blog tomorrow too. I’m not sure what exactly pushed me over the edge to bite the bullet and purchase the embroidery machine, but I am kicking myself now I didn’t do it sooner. I remember that it was a Monday and I just decided that I wanted one and had to have it. My friend Jenna did embroidery for me when I had something a customer wanted personalized, so I knew a little about them- especially in regards to hoop size. I knew I wanted one with a 5×7 hoop, and I went from there. For those who don’t know, the hoop is what locks your fabric in place and what you attach to the embroidery machine, so it can work its magic. A 5×7 hoop means that you have a 5 by 7 inch rectangle in which to embroidery a design. Unlike sewing machines, there aren’t a ton of different embroidery machines on the market, making it pretty easy to make a decision once you set your price limit. When my husband got home from work that afternoon, I laid out my plan and explained how this machine would quickly pay for itself. To my amazement, he bought it, and let me place the order.

That’s the history, here’s what happened next. The machine was scheduled to arrive Wednesday. UPS usually is at my house around lunch time. Wouldn’t you know it, that day they didn’t come till 5:30. I seriously spent the entire day peeking out the window, and when the big brown truck finally drove up, I ran to meet the driver. I was able to get the machine unpacked and set up before dinner that night. As soon as my son went to bed, I was ready to attempt my first practice project.

My machine came preloaded with some fonts and designs, but I spent the day before purchasing and downloading some things, and experimenting with two different editing programs on the computer. I was ready, and knew just enough to be dangerous. My first attempt, I hooped my fabric incorrectly, used bobbin thread instead of embroidery thread, and broke 2 needles. The second attempt went much better!

I wish I could say it has been smooth sailing, but it hasn’t. I knew there would be a learning curve involved, but honestly thought that since I knew how to sew, I could pick this embroidery thing up quickly. Overall I have, but there have been some bumps along the way. Like the time I had the machine too close to the wall and the arm bumped and messed up the design. Or, when I thought I could use my husband’s great great grandmother’s Singer sewing desk as a spot to keep the embroidery machine and the shaking caused my thread to fray over and over and over again. Kinda embarrassed it took me an entire day and a half to figure that one out. Seriously, I was one mistake away from throwing the whole thing out the window, but we’ve reached an understanding and are on good terms again.

Once I made nice with the embroidery machine again, I went crazy embroidering things. I put a monogram on our bathroom towels, a throw pillow, and did a scarf for a friend to practice embroidering on jersey knit fabric (that could be it’s own post, but *think* I have that figured out). Perhaps the most fun thing about this machine is the new world of possibilities it opens up with things I can create. I have done a few hooded towels for my son and his friends and plan to add those to the etsy shop in the new year. I’ll blog about them soon. If you’ve made it through this post, thank you!

20131114-141522.jpg

20131114-141534.jpg

Toddler Blanket & Pillow Sets

So, I’m pretty much the worst blogger ever. I am going to try to do better. I’ve said it before and haven’t followed through, but this time I mean it. 😉 Lots is going on, and I want to update. My goal is to blog every day this week in an effort to catch up. My biggest news… I bought an embroidery machine! It’s something I thought about this time last year, so while it seemed impulsive, it really wasn’t. Big thanks goes out to Amazon Prime. I ordered the machine on a Monday night and it was here Wednesday afternoon. I’ll blog more about my love/hate relationship and my uphill battle on the learning curve tomorrow.

The first projects completed were personalized blanket & pillow sets. I made a Cars set for my son a few months ago. He loves it. It’s the perfect size for a crib, or (for him) just lounging around, and we use the blanket to help bundle him in the stroller. I bought Finding Nemo fabric for a set for Evie, a little girl from my Facebook moms group. You may not know,but Nemo is the mascot for the Lucky Fin Project, a group celebrating children with limb differences. Next, I completed two sets for birthday gifts. Whenever possible, I like to give handmade presents. It’s a way for me to try out new things, and I know that there won’t be another one like it at the party.

These blankets measure approximately 42″ square, and are backed with either fleece ($50) or minky dot fabric ($60). All sets come personalized and include a pillowcase that fits a travel sized pillow. They are available for special order now, and will be up in my etsy shop in the new year.

20131113-080806.jpg

20131113-080812.jpg

20131113-080818.jpg

20131113-080826.jpg

20131113-080833.jpg

20131113-080841.jpg

20131113-080848.jpg

20131113-080857.jpg

20131113-080902.jpg

The December Darlings

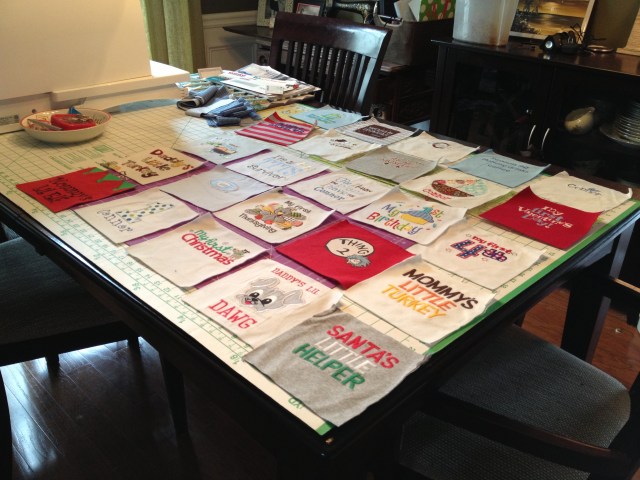
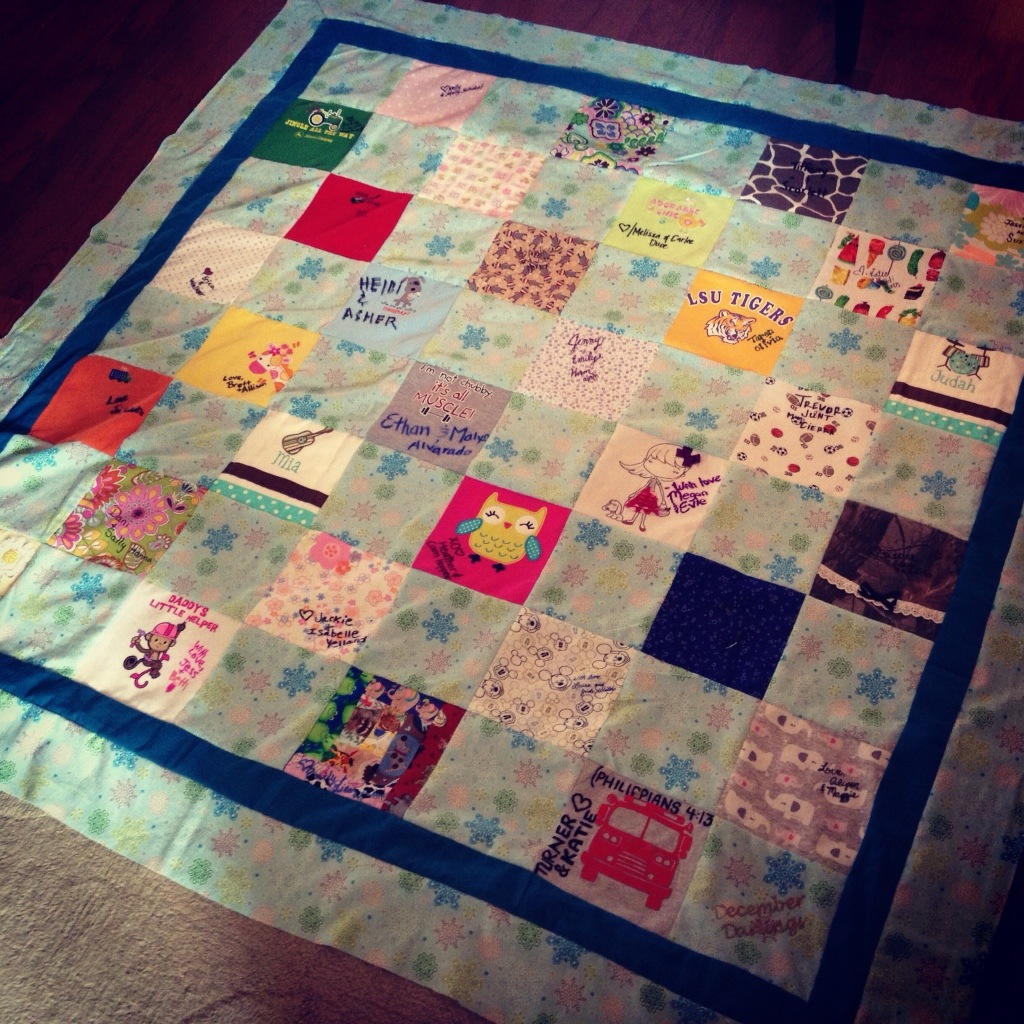
I am so excited about this quilt. It is an adult size blanket, using baby onesies. 32 onesies to be exact, that came from 30 awesome women (plus myself). The story behind this quilt began over 2 years ago…

Social media plays a huge role in our lives. What you may not know is that sites like Baby Center and The Bump serve not only as online resources for new mothers, but as a community of women. There are groups for everything from pregnancy, to motherhood, those struggling to conceive, dealing with a loss, and everything in between.

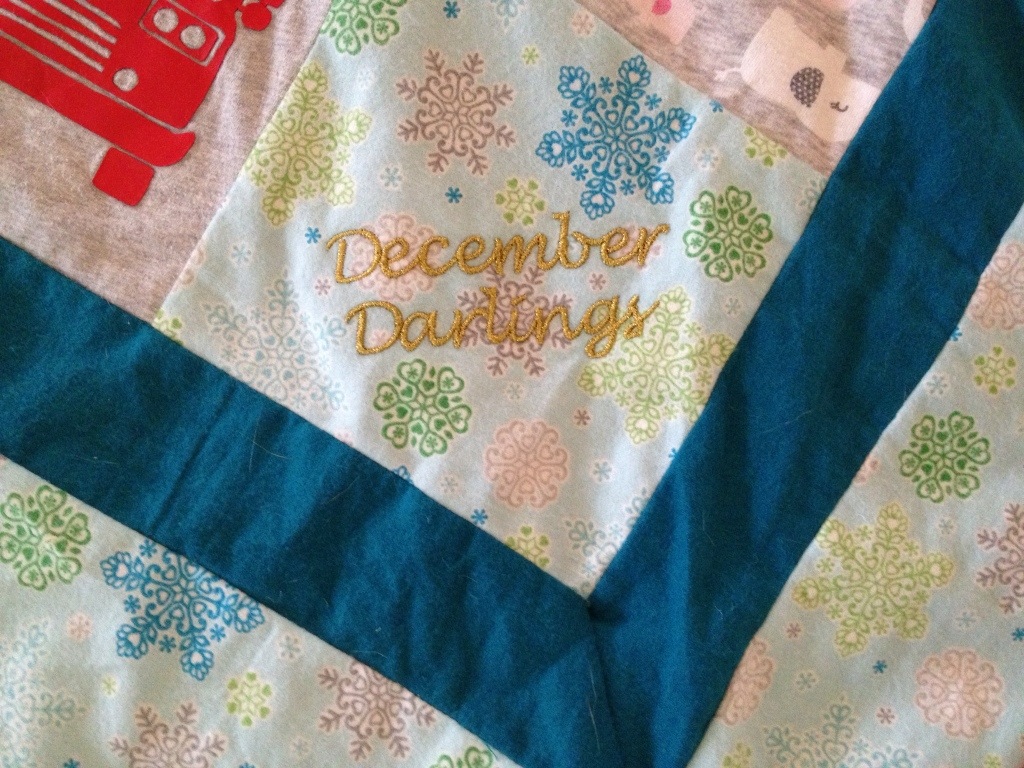
I found out I was pregnant with my son, March 30, 2011. I was already a member of the Baby Center online community, so I searched for a due date group to join. I had no idea then the impact that decision would have on my life. The group was called “The December Darlings,” and was a private board for women due December 1-10, 2011. People shared every aspect of pregnancy- the good, the bad, and the ugly. We grieved together as some women suffered miscarriages, prayed together as some (myself included) received troubling news, and rejoiced as our babies were born.

As the year drew to a close, our group dwindled. What was once close to 200 women was now 73. Anyone who’s had a newborn knows that sitting down at the computer can be a challenge, so most of us accessed Internet through our phones (especially those up nursing a baby at 2 am). For convenience, we decided to move our group over to Facebook. Not everyone made the move, but for the ones who did, our bond grew stronger.

We’ve supported each other through the loss of parents, miscarriages, deployments, sick children, and spouses with cancer. We’ve celebrated as our babies reached milestones, new pregnancies and the birth of younger siblings, homecomings, and more. Somewhere along the line we started sending gifts, and that’s where the idea for the quilt came to be. How cool would it be to have a blanket made up with something from each of us… I was eager to take on this project, and after weeks of nagging, I got enough onesies to make the quilt.

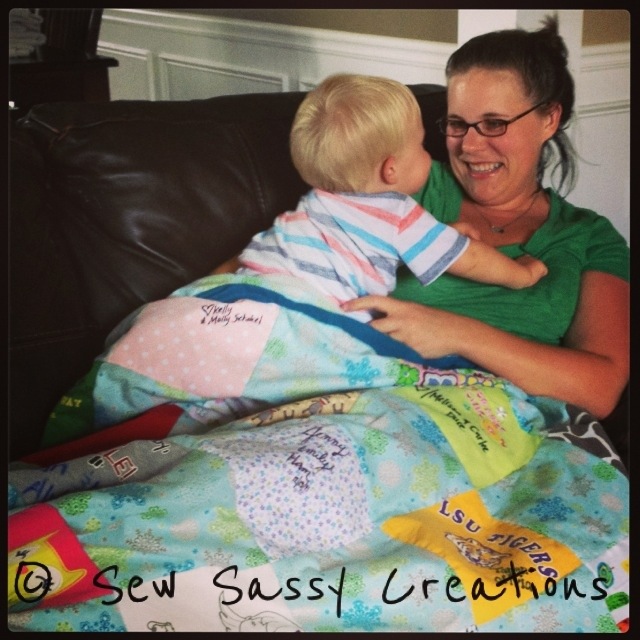
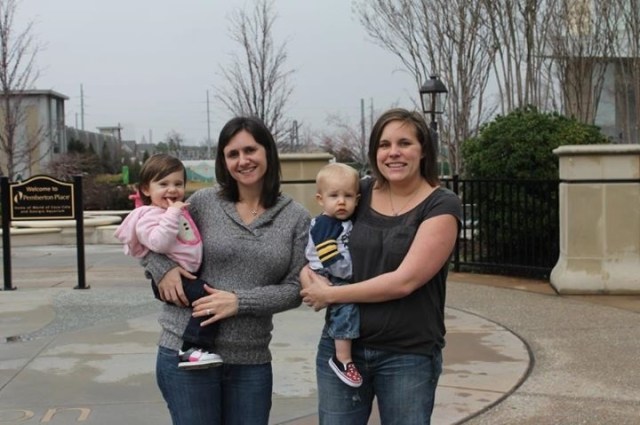
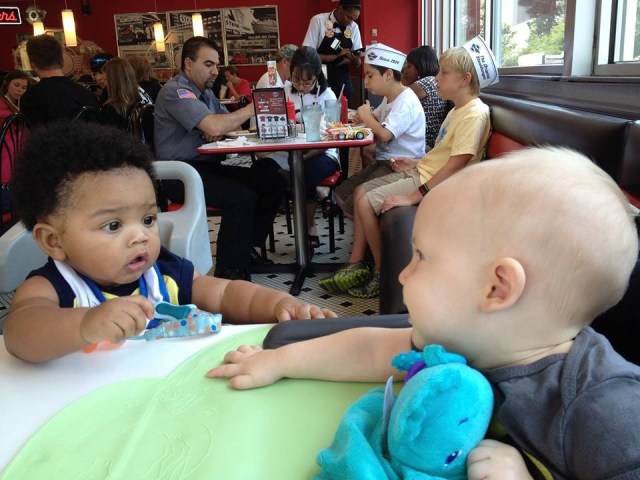
I’ll spare you the details, and focus on the highlights. What started off as women with one thing in common (motherhood), and over the past 2 years we’ve become great friends. Our group consists of 36 women, spread out over 23 states. We range in age from 22-42. Some of us are first time moms, others have 7 children. Many of us have had the opportunity to meet one another; I’ve been fortunate enough to meet 3 of my fellow darlings (pictures below). As a group, our dream is for all 36 of us to meet with our babies. Anyone out there with the power and funds to make that happen- my contact info is available on the blog.

I think our story is powerful. Support comes in all forms. These women, most of whom I’ve never met, I consider my closest friends. I truly don’t know how I would have made it through the past 2 years without them. In an online arena, there is no shame in asking the kinds of questions new mothers have. In our group, sometimes we jokingly wonder how our ‘real world’ friends get answers to their personal questions.These women are my sounding board for everything, and I’m so so thankful for that decision I made, back in the spring of 2011, to join this group.

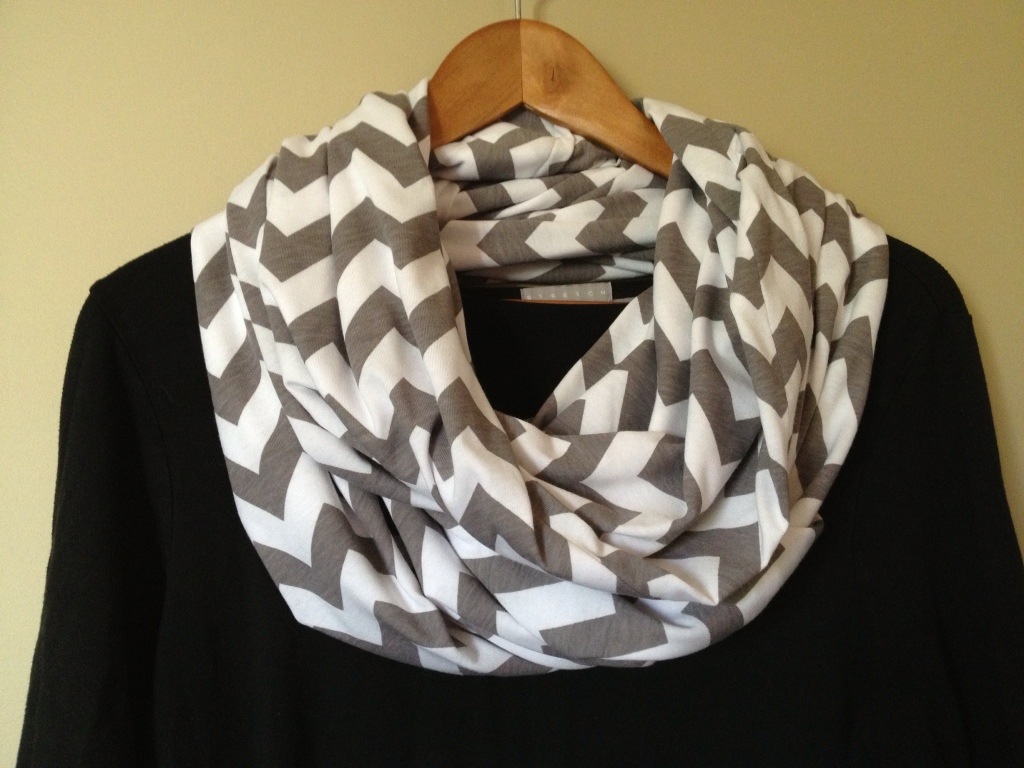
If you read through this, thank you! For those here for the quilt, this blanket consists of 32 onesies and 32 flannel squares, each measuring 7″. The teal border is 2.5″ and the snowflake border is 4″. The finished blanket measures 69″ square, and its backed with pale grey anti-pill fleece. We plan to “share” this blanket, sending it to those in need when they need it. I’m hoping nobody “needs” it soon because I’m not ready to part with it.

20130722-132735.jpg

20130722-132853.jpg

20130722-132910.jpg

20130722-132918.jpg

20130722-132957.jpg

20130722-133009.jpg

20130722-133208.jpg

20130722-133219.jpg

20130722-133232.jpg

20130722-133240.jpg

20130722-133746.jpg

20130722-133805.jpg

20130722-133846.jpg

Shiver me timbers!

A friend saw my superhero capes and came to me with an idea. Her son loves pirates, and he loves capes, so what about a cape with pirate fabric… I loved it. She picked out pirate fabric, and I helped her choose a coordinating print for the back and letter. When I was putting it together, I thought it would look better with a border around the outside. I can’t wait to hear what he thinks. Creating custom pieces is often the inspiration behind what I make and sell in my etsy shop. After seeing the pirate cape, another friend had an idea for a Yo Gabba Gabba cape for her little girl. Can you believe, they actually make a Yo Gabba Gabba superhero fabric?!?! We’re both super excited about it.

20130716-175908.jpg

20130716-175922.jpg

20130716-175928.jpg

Superhero Capes come to etsy!

Let me begin this post by saying I love being a “boy mom”. My son is my world. I absolutely love this new world of planes, trains, trucks, and cars. Anybody who’s ever gone shopping though, knows there is a gap in the market when it comes to handmade and personalized items for little boys. I am hoping that these capes are the first of many things I can create for my son and other little men out there.

When I was searching through mustache monograms (mustache cape), I came across a superhero alphabet monogram. My friend who does all monogramming for Sew Sassy, was kind enough to purchase and download it for me. I am so super excited with the results. These capes are made from two solid colors of jersey knit fabric, and use sewn-in velcro strips to close the cape around the neck. I found a great superhero fabric to use for the letters. The monogrammed initial is backed and framed with felt, and sewn onto the cape.

Timing on this project was perfect. My friend Susan Crutchfield took my son’s 18 month pictures, and we did some shots with his new cape. I am so excited with how these turned out, so please excuse my photo bomb.

Capes are available for order through etsy. Use the promo-code SuperBlog for a 15% discount off your superhero cape order.

20130712-141804.jpg

20130712-141918.jpg

20130712-141931.jpg

20130712-141940.jpg

20130712-141951.jpg

20130712-143548.jpg

Are you ready for some football?

Goodness, it’s been awhile. I’ll keep this post short, because really the pictures speak for themselves. I made this quilt for a friend, as a father’s day gift for her husband. He’s a huge Minnesota Vikings fan. The shirts were a combinations of his and hers, and then new shirts she bought specifically for the blanket. I love the fabric used on the front. I really don’t feel that pictures do it justice. It’s purple with metallic gold polka dots. I’d love to do a quilt like this for myself or family using Pittsburgh Steelers shirts…

20130711-130317.jpg

20130711-130333.jpg

20130711-130452.jpg

20130711-130522.jpg

20130711-130546.jpg

Nursing Covers

I nursed my son for just over a year. It was rewarding but stressful, convenient, yet difficult. Any mother who’s breastfed for any amount of time can relate to that statement. I am blessed that I have been able to stay home with my son, so I never experienced the stress of pumping, but because of that, he refused a bottle. I am a modest person, and tried to avoid nursing him while we were away from home, but when your baby eats every 3 hours, nursing while we were out was often unavoidable.

I received a nursing cover at one of my baby showers. It was one of the ones that you tied around your neck, and then used a large square of fabric to cover yourself and the baby. Seems easy enough, right? Not for me… First of all, I constantly would forget to pack the nursing cover in the diaper bag. When I did use it, I struggled to have it positioned just right. The overabundance of fabric frustrated my son, and I hated that I couldn’t look at him while he nursed.

Well, problem solved. The latest addition to my etsy shop is an infinity scarf that doubles as a nursing cover. This scarf is made from the same, super soft, jersey knit fabric, but is 50% wider, allowing just enough material to cover you and your baby. When you’re not using it as a nursing cover, it makes for a fashionable “chunky” infinity scarf.

These are flying off the virtual shelves. The grey chevron is the most popular color, and it’s easy to see why. This matches everything. It’s the perfect accessory if you’re going to be out and about. I placed a fabric order today, and the grey chevron should be back in stock the first week in June. I think these would be great gifts for new and expecting mothers. I know that all of my pregnant friends can expect to receive one from me.

20130523-143555.jpg
20130523-143632.jpg